
How to correct Vendor 1099 information in Dynamics GP
27/12/15 21:49 Filed in: Dynamics GP | Purchasing
Every year there comes a time when you need to deal with 1099 reporting. And this process can be stressful for many. Along the year, some vendors may have been setup incorrectly, the some transactions entered and posted, then the vendor corrected, and so on. You get the idea. There are several key details to setup and manage correctly: Vendor 1099 status, and 1099 box to which transactions should be posted. There are many chances to get it wrong.
So it is no surprise that it turns out to be common that the 1099 reporting is not what you would expect when you actually run the year-end report. Thankfully, though, the folks at Microsoft have been listening, and in Microsoft Dynamics GP it is easier than ever to do massive corrections to not just vendor configuration, but to posted transactions as well, in order to get the reporting just right. The following is a step-by-step guide that shows how to correct 1099 vendor and transaction information in Dynamics GP.
Step 1 — Backup
Please make sure there is a backup of your data before executing these procedures. Although you can always “correct back” whatever you did, it will always be better if you have a good backup before starting, as transactions will be changed in the system.
Step 2 — Open the “Update 1099 Information” window
The main window used to correct 1099 transactions in GP is the “Update 1099 Information” window. Please note that this window has added functionality since GP 2013 precisely to be able to correct 1099 transaction information. This window is found under PURCHASING > UTILITIES > Update 1099 Information.
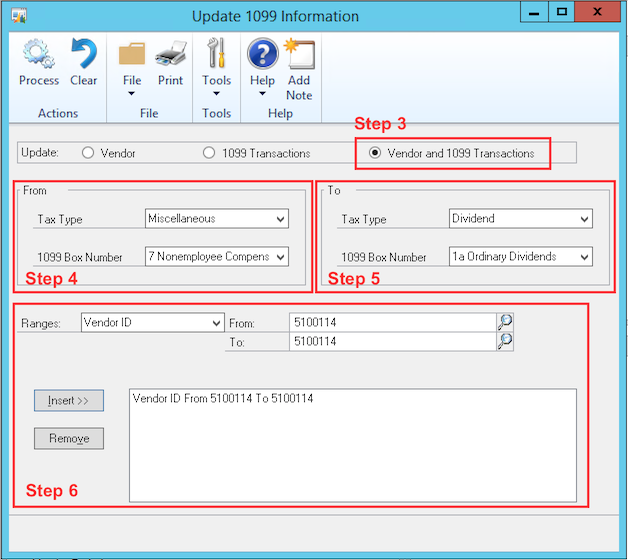
Step 3 — Select type of update
The type of update is shown in the first section of this window. You need to select the last radio button for 'Vendor and 1099 Transactions'. (Only this selection will work.)
Step 4 — Select “From” info
In the “From” section of this window, you select the “original” state of the Vendor and its transactions. You can select “All” and “All” for Tax Type and 1099 Box Number respectively if you don’t care what the current tax type and box number are selected for the vendor and transactions themselves.
Step 5 — Select “To” Info
In the “To” section of this window, you select the “new” state of Vendor and its transactions that you desire. For example, you may want to change whatever type was used in the posted transaction to Tax Type “Dividend”. Make sure to select the correct 1099 Box Number as well.
Step 6 — Select the range of vendors to affect
Here you select one or multiple ranges to make sure only the vendor (and their transactions) that you want changed are affected by the process. You can select one range at a time and “Insert” into the Restrictions Box, then repeat the process for another restriction type. For example, you can insert Vendor ID and Document Date restriction ranges to affect maybe a particular vendor and its transactions only for 2015. The ranges available are shown here:

Ranges are tricky in that you want to make very sure the complete restriction you insert contains all of the vendor and transactions you want, but ONLY those you want.
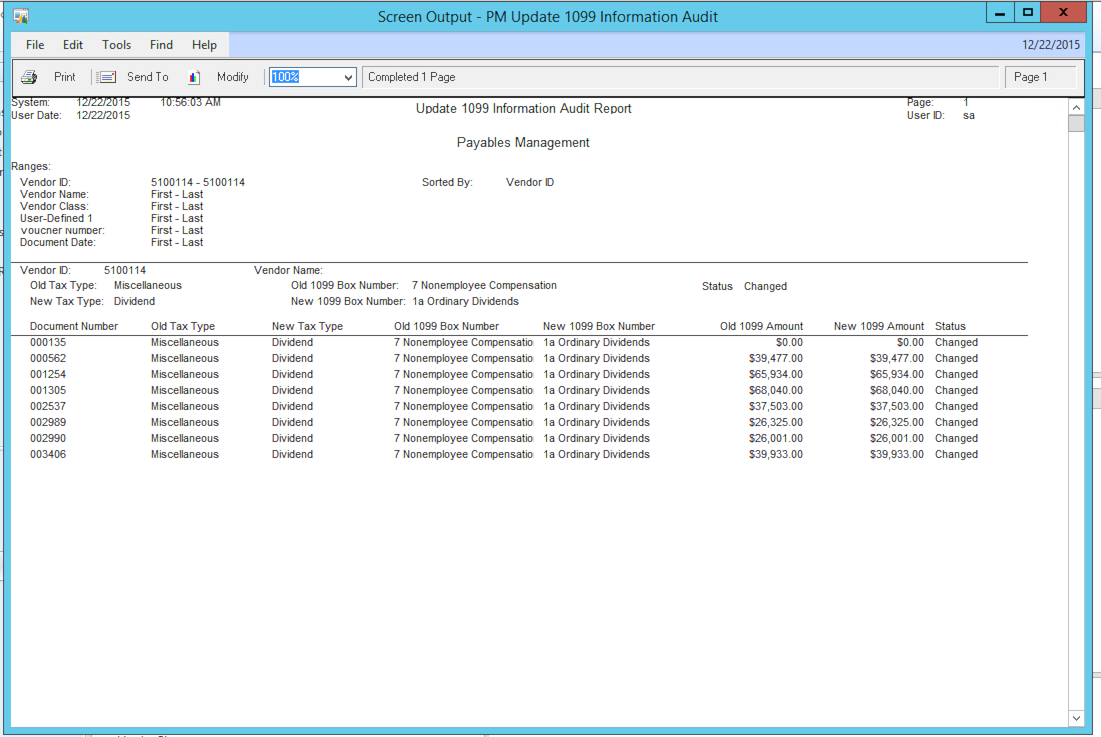
Step 7 — Process the changes
The next step is to click the “Process” button. The system will make the changes to the vendor ID setup as well as any transactions that match the “From” specification and the restrictions inserted. At the end of the process, the system will show a report making it clear which transactions were changed:
Step 8 — Repeat as necessary
You may want to run this process one vendor at a time (or even one transaction at time if you have only a few transactions needed changes), for example, so feel free to repeat the process as necessary to make sure all of the transactions you need changed are processed.
So it is no surprise that it turns out to be common that the 1099 reporting is not what you would expect when you actually run the year-end report. Thankfully, though, the folks at Microsoft have been listening, and in Microsoft Dynamics GP it is easier than ever to do massive corrections to not just vendor configuration, but to posted transactions as well, in order to get the reporting just right. The following is a step-by-step guide that shows how to correct 1099 vendor and transaction information in Dynamics GP.
Step 1 — Backup
Please make sure there is a backup of your data before executing these procedures. Although you can always “correct back” whatever you did, it will always be better if you have a good backup before starting, as transactions will be changed in the system.
Step 2 — Open the “Update 1099 Information” window
The main window used to correct 1099 transactions in GP is the “Update 1099 Information” window. Please note that this window has added functionality since GP 2013 precisely to be able to correct 1099 transaction information. This window is found under PURCHASING > UTILITIES > Update 1099 Information.
Step 3 — Select type of update
The type of update is shown in the first section of this window. You need to select the last radio button for 'Vendor and 1099 Transactions'. (Only this selection will work.)
Step 4 — Select “From” info
In the “From” section of this window, you select the “original” state of the Vendor and its transactions. You can select “All” and “All” for Tax Type and 1099 Box Number respectively if you don’t care what the current tax type and box number are selected for the vendor and transactions themselves.
Step 5 — Select “To” Info
In the “To” section of this window, you select the “new” state of Vendor and its transactions that you desire. For example, you may want to change whatever type was used in the posted transaction to Tax Type “Dividend”. Make sure to select the correct 1099 Box Number as well.
Step 6 — Select the range of vendors to affect
Here you select one or multiple ranges to make sure only the vendor (and their transactions) that you want changed are affected by the process. You can select one range at a time and “Insert” into the Restrictions Box, then repeat the process for another restriction type. For example, you can insert Vendor ID and Document Date restriction ranges to affect maybe a particular vendor and its transactions only for 2015. The ranges available are shown here:
Ranges are tricky in that you want to make very sure the complete restriction you insert contains all of the vendor and transactions you want, but ONLY those you want.
Step 7 — Process the changes
The next step is to click the “Process” button. The system will make the changes to the vendor ID setup as well as any transactions that match the “From” specification and the restrictions inserted. At the end of the process, the system will show a report making it clear which transactions were changed:
Step 8 — Repeat as necessary
You may want to run this process one vendor at a time (or even one transaction at time if you have only a few transactions needed changes), for example, so feel free to repeat the process as necessary to make sure all of the transactions you need changed are processed.